The 690 chameleon
The KTM 690 Enduro R is probably the most versatile adventure bike ever built. It is especially good for rally travel, but will also turn into a fairly capable adventure enduro whip. I was looking at the latter, when pulling the trigger on my 690 in 2013. It ended up carrying a steep learning curve into wrenching, but primarily a ticket into epic adventures into the empty places of the world.
The build
WIRING
The wiring on the bike needs a little extra protection. Most of it is pretty loose and naked just before the connectors. I guess that would not be such a problem on a road bike. However, add the vibrations of a thumper to sand and dust, and you’ve got yourself the equivalent of an army of little rodents teeth gnawing at the insulation. Eventually this will result in shorts and a lot of hassle.
I just taped up the naked wires leading to the connector and sprayed all connectors with electrical vaseline. This is best done when the bike is new so you won’t be sealing the little sand particles inside the wiring. I wrapped the electrical tape around a small socket to reach the tight spots. I also added some MTB inner tube between the zip tie points to reduce the risk of abrasion under vibration.
REGULATOR RECTIFIER
Some riders have had their OEM rectifier fail. It’s pretty rare but I didn’t want to take a chance. There are also other benefits with a MOSFET type regulator. So I replaced the OEM part with a Shindengen FH008 MOSFET regulator. The Shindengen FH008 dimensions are identical to the OEM and bolts straight on. I added some connectors close to the regulator so it can be replaced quickly without removing the airbox. I added the same connectors to the OEM part so it can be used as a spare in case the Shindengen fails. The Shindengen produces 14.3 V on idle.
REAR INDICATORS
These are very fragile and right where your boot goes when getting on and off the bike. Mine didn’t last a week and I replaced them with mini LED:s.

ENGINE GUARD
I decided to go for the Rally Raid aluminium engine guard with tank by Rally Raid Products. The tank holds two liters, and I carry engine oil in it. I guess it’s normally used for water, but I prefer to keep my water in a CamelBak and need to carry engine oil on long trips, so this seemed like the logical place.
The Engine guard seems sturdy enough but needed a little tinkering. The sharp edges of the aluminium plate were eating into the plastic tank. I bent them outwards a little and filed down the sharp edges. Some of the rubber bungs on the tank also needed a little extra glue. I also added some MTB inner tube between the guard and the tank in high abrasion areas. Other than that, it seems solid. Now perfected with a Rally Raid sticker.


SILENCER
The stock silencer is heavy and gets very hot in use, so I replaced it with a lovely Akrapovic. In addition to fixing the afore mentioned issues, the Akrapovic improves the smoothness of the bike.

AIRBOX
Sealing the air filter to the airbox has been a bit of an issue on some bikes, including mine. I greased the bottom of the connecting lip on the air filter after noticing dust in my airbox. It still didn’t seal completely. Apparently this is due to the warping of the airbox under vacuum. It just isn’t rigid enough to stay in form under the vacuum of high revolutions. The airbox will give in a little and let air slip in between the filter and airbox lip.
I ended up replacing my paper filter with a High Flow Unifilter. This should do the trick as the pressure difference between ambient pressure and airbox pressure should be reduced. The Unifilter also has a higher seal which should help.
I changed the stock air filter cover to a KTM EVO-1 cover. It raises the air intake higher up, which is crucial in water crossings. It does make the engine sound very loud for the rider. I can’t even hear the exhaust due the induction noise.


SPROCKETS
Stock gearing is very tall on the KTM 690 Enduro R. No doubt with road use in mind. I’ve changed a 50 tooth steel sprocket to the back and will carry 15 and 16 tooth sprockets for the front and change depending on what I’m riding. This will make the bike more manageable in technical stuff and also help save the clutch a little.

BEARINGS
The bearings that I’ve had the most water penetration and wear in have been in the sprocket carrier, the triangle lever, the bottom of the rear shock and the swing arm. The wheel bearings seem to last forever but I still change them annually along with any others that are filled with grime or have play in them. Before installing the bearings I take off their dust covers on both sides and pack the bearings with Mobilgrease XHP 222. I also regularly cleaned and greased the steering stem bearings and pull rod bearings.


TAIL FENDER
The EU tail fender is inpractical and looks terrible. I took it off and gave the short tail fender a little heat gun and bent it down to a legal angle. The registration plate holder bolts straight onto the fender.
The EU registration plate is roughly the size of a pizza box. It doesn’t last long while riding soft stuff. Especially swamps will kill it quickly with a spray of turf. Both our plates broke during our test run. I will mount a small showplate for Eastern Dirt 14.


SUSPENSION
The OEM suspension does a nice job on gravel roads, but I wanted more travel. So I went for the Rally Raid Fork Extension Kit and Tractive Suspension Rallye Shock from Rally Raid Products. The OEM travel was was raised by 50mm from 250mm to 300mm. The front shocks were revalved by Ari Nurmela, the suspension guru from MP Racing, who’s done the suspension for several Finnish enduro world champions. I was a little sceptical about the fork extension but it performed well enough for me. Especially after Ari did his magic on it.
The Rallye Shock is incredible. I was really impressed with it during our test runs. It just seems to go forever and no matter what kind of ruts and ditches you take on the rear wheel, it just remains smooth and composed. We had roughly 30 kg of luggage each on our test trip and zero problems.


LUGGAGE
The superiority of soft luggage on these kinds of trips is well argued by Walter Colebatch. I couldn’t agree more, and also ride with Adventure Spec Magadans. I used to prefer to have them the wrong way around though, with bottle pockets facing backwards. This way I could keep my extra gloves and rain gear in the front pockets, without them getting too dirty. On long trips where I need to carry bottles for engine oil and air filter oil, I keep the bottle pockets in the front. I’ve added bungee loops on the pockets to secure the bottles.
As for luggage racks, my money is on Rally Raid soft luggage racks, which I’ve said before. You do have to be careful with the RR racks though after falls, because they do bend. This is a design feature though, as the plastic deformation of the steel rack absorbs a lot of energy, instead of allowing it to pass directly to the mounting nuts on the plastic rear tank. While it’s a good thing in keeping the tail tank in one piece, the bottom of the rack will hit and chafe the swing arm eventually. So make sure to bend them back to shape after tumbles.
I use normal cargo straps with metal fasteners to secure the panniers to the racks. I used to have them lower, which resulted in the left hand pannier making contact with the side stand. This resulted in minor abrasions. The bike was felt a little more unpredictable in terms of handling as the luggage could swing a little while hanging low. There was also very little clearance for boots and in technical terrain I kept getting my foot caught between an obstacle and a pannier.
So I raised the panniers higher up and further back. I’ve added pics of the strap connections. The key is to avoid contact with the sharp edges of the perforated holes on the rack plate. They’ll eat through the cargo webbing in three to four hours thanks to the vibrations of the LC4. So I use hitches and loop the webbing between the bike and the rack plate. The front connection point on the horizontal strap has a sharpish edge but due to the hitch, it can’t move around and has survived thus far. I want to have a hitch on the vertical strap too, so that I can tighten the strap upward, relieving weight off the velcro straps over the seat. I keep the velcro straps very loose to make sure the weight of the luggage is on the racks, and not on the seat. This keeps the center of gravity lower and improves handling. The placement of the perforated holes isn’t perfect, which results in a little sideways pull on the vertical strap. It should survive, though.
I use a Giant Loop Fandango tank bag. It’s a little too big for my taste, but it has enough room for everything. I’ve ran a wire with a cigarette lighter socket into the bag. It gives me the option to charge camera batteries, cell phone, satellite phone in addition to holding road snacks and a DSLR with lenses. I’m into my second Fandango, as both of the lid zippers on the first one failed catastrophically in Siberia. I was probably too ham fisted and told the seller, Adventure Spec, about it but they still replaced it.


FUEL FILLER CAP
The OEM filler cap neck is very low. Fueling after some dirt circus will probably result in crud entering the fuel tank. The lock on the OEM fuel cap is pretty stiff and probably will get even stiffer during use. The key on the other hand is very thin. I didn’t fancy either of the mentioned issues and replaced it with the Rally Raid filler neck and Acerbis breather cap.

TANK AND SUBFRAME BOLTS
The OEM tank and subframe bolts have been known to fail under stress. I replaced mine with the Rally Raid Lower tank mounting bolts and subframe bolts.


FUEL. CAPACITY, FILTRATION AND INJECTION.
I originally had just the OEM tank and a Rally Raid 4.5 l tail tank. That setup gave me fuel capacity of 16.5 l, or more or less a range of 300 km. It’s just not enough, so I added the Rally Raid EVO-2 front tanks for a total fuel capacity of 26.5 l. Optimally, this should give me a range of 500 km.
Getting enough fuel onboard is one thing but keeping it usable is another. The main fuel filter is inside the OEM fuel tank so I added another filter after the Rally Raid tanks and an extra filter before the injector. That filter only filters whatever is in the Rally Raid tanks, so I also added a filter between the main tank and injector. Now all fuel is filtered twice before hitting the injector. We were also looking into fuel tank bags to collect the larger pieces of debris that enter the tank during fueling, but it turned out to be a no go.
The fuel pump connectors can become loose in vibration, so I drilled mine with a 1.5 mm drill and added lock wires.
If any impurities should make it through the fuel lines, it will clog the injector which then needs to be cleaned. Preparing for this, I’ve replaced the OEM Philips screws with the Rally Raid Injector Hex screw kit for easier and reliable access.


NAVIGATION
I was originally thinking about one of the motorcycle specific navigators, but wanted something I could also use for mountain biking. So I decided to get the Garmin Montana 600 and haven’t looked back since. I love it. It is very versatile with good battery life. Not that you really need the battery while riding as the Montana sits on a powered cradle, also by Garmin.
As for the navigation cluster. I’ve never had any kind of motorbike with a screen or any wind protection so I don’t miss it. I feel Rally fairings are obtrusive and get in the way of the view. The one I’ve tested also result in uncomfortable wind chop as opposed to protecting you from it. The good thing about the Rally fairings is of course the dash. You get everything right where it needs to be, and well protected too. In the end I went for the Rally Management Services universal mounting clamps. I had them anodized black to remove glares and for general awesomeness. The GPS is mounted on a RAM mount which in turn is mounted on the crossbar. I also added a DIY 12mm adapter to avoid wear on the crossbar. The RAM mount is very handy as I can tilt the GPS up and down, depending on if I’m on the pegs or seated. It also enables to switch from landscape to portrait view quickly. You do have to lock the screen orientation on the Montana though as the vibrations of the bike mess up the orientation sensor on the Montana.
Since I took up mostly riding solo, I’ve added another Garmin Montana for backup. I’m not big on carrying paper maps.


LIGHTING
The OEM headlight on the 690 needs a bit of upgrading for missions in the dark. I decided to go with a Baja Designs SII LED Spot light. It’s connected directly to the navigation crossbar. I wired the LED light directly instead of the high beam on the OEM headlight. So it works from the high beam switch, but the OEM high beam never activates and the low beam is always on.
The fit with the OEM mounting bracket was a bit too tight for my taste. The wiring was in contact with the RAM mount bolt. I made a DIY bracket out of steel, painted it black and bolted it on. Sorted.


RADIATOR
I used to run the KTM rad protectors. I changed to the Rally Raid Radiator Protector and Radiator Screen though, because I wanted to add a protective screen in front of the radiator. The RR naked metal screen was a bit too bling for my taste so I had it painted black. Same goes with the protector plates.
The radiator protector works fine for the most part, but IMHO there is a small design flaw; a 10 mm crack between the bottom of the screen and the mounting bar. This allows knobby tyres to fling mud right up and onto the radiator. I’ve been meaning to rivet a small aluminium flap onto the bottom bracket to cover the gap but never got around to it.
I replaced the 105 degC OEM thermostat switch with an Rally Raid 88 degC fan thermostat switch. It’ll switch on the radiator fan earlier, which in turn keeps the engine a little cooler.


SIDE STAND
I’ve added the Side Stand Dummy plug by Rally Raid to get rid of another potential fail point. I also added the Side Stand Foot Extender for use in soft terrain.

CHAIN GUIDE
TM Designworks. Bulletproof with replacable bottom plates.

CHAIN LUBRICATION
I use and OSCO, the One Second Chain Oiler. It’s an ingenious dutch design, which is totally manual and doesn’t connect to any wiring or lines on the bike. So if it fails you dump it without anything needing capping or rewiring. I also like the idea of being able to decide when the chain needs oil instead of a continuous drip. This makes it handy especially on days with several water crossings etc. It’s designed to be connected to the chain guard, which results it dropping the oil on the outside of the chain. Instead, I’ve run the oil line into the chain guide which results in the oil being deployed on the inside of the chain, where it needs to be.
After a year of use the OEM oil line had hardened up. I decided to go for a thicker line for extra protection.


FRONT SPROCKET GUARD
If the chain breaks during riding, it can whip into the clutch slave cylinder an kill it. End of the trip. So I replaced the OEM sprocket guard with a Rally Raid Billet Sprocket Guard.


FRONT BRAKE LINE
The OEM front brake hose is a nuisance where it’s situated, on the clocks. Especially if you intend to have any kind of navigation equipment above the speedo. I routed mine Rally style, over the front fender, resulting in a nice clean cockpit. The brake hose is a custom made 130 cm Hiflex hose. The banjos are aligned, with a 45 degree bend on the top banjo. The hose clamps on the lower triple clamp are 10 mm stainless steel P-clips with rubber inserts. The brake hose and speedo cable are held together by a loose spiral cable wrap.


REAR BRAKE LINE
The OEM rear brake line is held in a cradle, that is bolted on to the swing arm. The cradle raises the brake line from the swing arm. Enough for the Rear tank to make contact in big hits and squash the brake line. The brake line is attached out of harms way with P-clips.

THE SEAT
A lot of people have complained the OEM seat being uncomfortable. I haven’t noticed. Even though I’ve been on it up to 28 hours in one go.
HAUL LOOP
This comes in handy when you need to drag the bike out of a bog or ditch. There’s no hitec here, just some webbing and two knots. I made the loop just long enough to go over the headlight and tuck in behind the mask nicely.


MIRRORS
I love a clean view, so I only have a single folding mirror, that I only use in traffic.


TYRES
I ride with Mitas C-02 in rears and some or another MX tyre in front. Both have rim locks and have been balanced accordingly with spoke weights. I run Michelin UHD tubes. I’ve also put in a standard tube between the tyre and the UHD for extra protection. The problem with the UHD tube is that it can’t be patched up. So I carry a thinner rubber tube, that can be patched up, and cut up the UHD to use as extra protection when it gets punctured.


FULL SERVICE HISTORY
Everything I’ve ever done to the bike is documented in the list below. Please click on the service tabs for details.
Change oil
Check coolant
Check bolts
Akrapovic slipon and injection map
KTM aluminium bash plate
KTM Rad guards
Change oil and filters
Tank bag / Giant Loop Tank bag, Giant Loop Fandango White
OSCO chain oiler
Garmin Montana 600 GPS
Check air filter seal
LED mini rear indicators
Registration plate light
Rally Raid rear tank
Rally Raid soft luggage racks
Rally Raid Billet tank cap
Rally Raid Side stand extension
Rally Raid Sprocket guard
Rally Raid fuel tank bottom bolts
Rally Raid fuel tank top bolts
Magadan Panniers
Navigator RAM mount
Change oil and filters
Check air filter
Replace Rally Raid rear tank
Replace front tyre / Michelin AC-10
Replace rear tyre / Dunlop Geomax MX-71
Change oil and filters
Check and adjust valve clearances
Change air filter
Garmin handlebar mount
Rally Raid Fork extension kit
Rally Raid Tractive rallye shock 300 mm
Rally Raid Front tanks
Rally Raid Radiator protector
Rally Raid Radiator screen
Rally Raid Tank shrouds
Rally Raid 88 deg fan thermostat
Rally Raid Injector hex kit
Rally Raid Engine guard with tank
Front brake hose rally routing
Fuel lines for front and tail tanks
Clean throttle body
Haul loop front
RMS Navigation clamps
Anodize navigation clamps
RAM mount to clamps for Montana
Revalve forks
Clean and grease steering stem bearings
Filler cap breather hoses
Front wheel bearings, clean and grease
Baja SII LED high beam
LED high beam wiring to KTM switch
Rear wheel bearings, clean and grease
Sprocket carrier bearings, clean and grease
Grip Donuts
Black front fender
Black hand guards
OSCO mount
OSCO drop zone to chain guide
Brake pedal bolt, drill and lock wire
Front rim lock
Rear rim lock
Rim lock counter weights front and back
Replace rear tyre / Mitas C-02
Rally Raid Side stand switch eliminator
Replace swing arm bearings
Replace tri lever bearings
Replace chain guide / TM design works
Replace chain slide
50-T rear sprocket
Replace rear tyre / Mitas C-02
Replace rear tube / Michelin UHD
Replace rear wheel bearings
Replace sprocket carrier bearings
Change oil and filters
Replace chain and master link
15-T front sprocket
Replace front tyre / Michelin AC-10
Replace front tube / Michelin UHD
Replace Front wheel bearings
Reroute OSCO
Check valves
Lower rear brake hose mount on swing arm
Replace rectifier / Shindengen FH008
Replace air filter / Unifilter
A1 Mini register plate
Replace oil and filters
Change tyres / MITAS C-02 and C-05
Wash and oil Unifilter
Replace oil and filters
Replace fork oil
Change tyres MITAS C-02 C-17
Wash and oil Unifilter
Replace oil and filters
Change tyres Heidenau K-60
Replace chain and sprockets 16/50
Wash and oil Unifilter
Fork service and revalve
Valve clearance check
Replace intake and exhaust rockers
Remove quick connect from fuel line
Replace tank fuel filter
Replace secondary fuel filter
Replace RR tank line filter
Replace fuel pump net filter
Change engine oil and filters
Replace tank bag
Replace front tyre / Michelin AC10
Replace rear tyre / Mitas C-02
Check wheel bearings, front
Replace front tanks
Replace sprocket carrier bearings
Drill hand guard rails and secure
Wash and oil Unifilter
Replace headlight bulb
Replace outside fuel filter
Rear shock service
Clean and grease linkage bearings
Clean and grease pull rod bearings
Clean and grease swing arm bearings
Replace chain slide
Replace wheel bearings, rear
Replace Rear sprocket 50T
Replace wheel bearings, front
Replace rear brake pads
Check front brake pads
Change spark plug
Check front brake disc > 4.5mm
Check rear brake disc > 3.5mm
Wash, oil and install Unifilter
Replace rear tyre / Mitas C-02
Replace front tyre / Mitas C-17
Replace 50 T sprocket to Supersprox
Replace Chain
Replace Front sprocket 16T
Check valve clearances
Check shims
Replace fuel filter outside
Check and protect wiring
Secondary GPS cradle
Secondary GPS
Wiring for secondary GPS
Black tail fender
Replace fuel pump
Replace injector
Replace breather caps
Top up clutch fluid
Top up front brake fluid
Check rear brake fluid level
Replace oil filters and cover o-rings
Replace oil sieves,covers and all o-rings
Replace oil and filters
Replace Donuts
Replace rear tyre Heidenau K-60
Replace rim tape
Replace rear tyre / Mitas C-02
Replace battery
What’s next?
Everything on this page is open for debate. What have I missed? What would you have done differently?
Excellent to see a well thoughtout project using a variety of products, excellent advice for anyounestarting out on an adventure, good luck with your trip Jussi! Keep us all up to date.
What sort of torque wrench do you suggest, for KTM 690 enduro ? Thank you!!
Hi John, I can’t remember the ranges from the top of my head, but I probably mostly use a 10-40Nm wrench for all bolts up to M8 and the bigger stuff i.e. sprockets, axles etc. with a 30-210Nm. It’s essential though to get a hand feel on the torque, so you can do it in the field without the torque wrench.
Great write up! Thanks for sharing! Any issues with vibrations? I can barely handle the bar vibrations on short trips, so I can’t imagine long trips! I’ve ordered a set of vibranators hoping that’ll do the trick. Any advice?
Hi Albert. Which year is your 690? I haven’t really had issues with my K13. Apparently some of the previous versions vibrate more. Some of my friends put lead pellets into the handlebar ends, which apparently smooths it out a little. I hope you get it sorted!
Excellent blog. I’m impressed. Your past and futur trips are incredible.
Just a question about the RR tank. What kind of sticker (if any) did you put to the tank?
Thanks and Regards,
Eric
Thanks Eric! The RR tank kit included a protective sticker. It’s a bit too glossy for my taste and I didn’t put it on the tank. I will put normal outdoor use stickers on the tank. I should have them in a day or two and will post pics when the bike’s all buttoned up. We’ll see how they hold….
Thank you very much for sharing your setup! I got a few new impulses. We are also preparing 2 690 Enduro R (2014). Are you not concerned about the OEM footbrake lever? I replaced mine last week with the RR part after it broke. Nearly everytime the bike came off onto the right side the lever was bent. After the 3rd time it broke while trying to straighten it. I even heard from someone who pierced his gearbox with the lever which caused to stop the trip. Does the RR engine guard provide some extra protection for this case? I would be happy to see a picture taken from above and from the front (knee hight) if you’ll get the chance. Thanks again, Wolfgang
https://fbcdn-sphotos-e-a.akamaihd.net/hphotos-ak-xaf1/v/t1.0-9/10624777_10202975157008432_7995434986346487163_n.jpg?oh=da4f63631c36000024c7f4add05c4f39&oe=54CE72BA&__gda__=1422416398_e508e99ba24ff970ee2d793136a7bd11
Hi Wolfgang! I think you are right and it should be addressed in the adventurizing of the 690. I have been lucky though, as I’ve taken a lot of falls but never broken pedals or levers. However, I did carry a spare brake pedal on ED14. I was going to get the Rally Raid billet pedal, but they were out of stock at the time.
Concerning the extra protection on engine casings. The Rally Raid engine guard with tank does add a little protection to the casings, but not directly like crash bars. The benefits of the RR engine guard are elsewhere. The big issue is, do you actually need crash bars? I think Walter Colebatch answered this question very well: http://bit.ly/1x1ZCmM
Thanks for the photo. I’ll send you the photos you requested when I visit the garage later this week. Ride safe!
Hi again – sorry for my stupid English. I ment extra protection for the brake lever not for the engine case. (I agree, crashbars are not really necessary.) The RR bash plate looks wider than other bash plates and I wonder if this could help to protect the brake lever in case of a dropping the bike onto the right side. For that I would love to see the photos later. Thx Wolfgang.
No worries Wolfgang! I sent you an e-mail with the pics.
Hi,
Here you have a new follower, sick as you about motorcycles and adventure travels, and owner of a 690 for just only 800 miles unfortunately, I had to sell it before I could taste it…
Would you recomend the 690 as a travel adventure bike? Pros and cons?
Big hug from an argentinian living in Germany, I´ll keep following you 😉
Martín
Hi Martin!
Too bad you had to sell the 690. I think it’s a nice allrounder. I guess selecting the perfect travel adventure bike boils down to what you consider adventure and what you will be riding. Some people will be very happy with riding tarmac on big 1190 Adventures and some people will take nothing heavier than a 500 EXC with minimal gear to cope with technical stuff. I really like the 690, but my next bike will probably be something in the range of a 500 EXC or FE501.
There is very good information concerning bike selection in Walters site. I suggest you have a look here:
https://www.sibirskyextreme.com/2013/08/bike-selection-101/
https://www.sibirskyextreme.com/2013/09/adv-bike-selection-2/
https://www.sibirskyextreme.com/2013/11/adv-bike-selection-3/
Fine. I have a question – if you put a set of 14/50 sprockets is how to change the length of the chain? If I am not mistaken, in the stock case is a chain 118 links?
Hi Sergey, the chain was cut to size with a chain tool. The chain works with both 15/50 and 16/50. We did not carry 14t front sprockets.
This is the best single write-up I’ve seen on adventurizing a 690. I added a permanent link to your article at the 690 Enduro Forum. http://690enduro.createaforum.com/index.php Thanks for sharing the result of your hard work. Your bike looks great.
Thanks Russ! Loving the forum!
Haven’t seen the blog posting for the story of destroying your tanks yet but was wondering if you had seen the tank guards made by rally raid engineering?
Seem like some good protection and for the same price as rally raid wants for the graphics kit I think it would be a justified purchase!
Hi Jim, thanks for the tip! I hadn’t heard of Rally Raid Engineering before and the tank guards look interesting. I’ve been racking my brain for other solutions to protect the tanks without success.
The tank got trashed on day 33, if my memory serves me correct. SO a few more days to go 🙂
Yea I’ve been trying to come up with a solution as well. Crash bars like touratech makes don’t seem like a good Idea as I’d rather the tanks get messed up then the frame get twisted or damaged.
Hopefully your life is getting settled so we can get some more stories!
Yeah, I agree. Making the whole thing too rigid will just move the problem elsewhere. This is also true for the Rally Raid Soft Luggage Racks. We did have to bend them back into shape a couple of times as they do get bent in falls. The plastic deformation of the rack absorbs a lot of the energy of the fall. If they were more rigid, the weld seams might be breaking or the bike frame be damaged, as you said. It’s better to keep the shell of the system elastic than rigid. Energy never disappears.
I’m working on day 22 as we speak 🙂
Thanks great article! I found the rear brake pedal pathetic, I could bend it with an angry glare. RR make a nice strong one. Did you not find after raising it 50mm it made the centre of gravity in little high in very technical sections?
The RR pedal is good I’m sure, but the thing is that with the RR engine guard with tank, the pedal is very well protected. Neither of us had any issues, despite several falls. Having said that, I must admit that I was carrying a spare pedal.
As for the height, you’re absolutely right. The bike felt tall with a high COG. The thing is though, that you get used to it very quickly when riding. The biggest issue was picking up the bike. You really feel the extra length on the lever of the mass. I still wouldn’t go back to OEM suspension. The 300mm Rally Raid Rallye shock was just incredible. I used to frequently bottom out the OEM without luggage, but only a handful of times with the RR shock, and this was with luggage. The spring rate of course affects the characteristics, but the RR just seems to go on forever with a lovely progressive damping.
Hey Hobo!,
great comments on your setup including the techno how to as well, top job!. This is the most comprehensive i have seen for the 690. I have just sold a 2012 500exc and looking at 2015 690, your comments are spot on around the bike types. I am planning to do some longer trips this year and will look to replace the 500 next year (keeping the 690) for end. I will be working through your set up recommendations once the new 690 arrives in Feb/March. Will seek some comments again once its out of the box
Hi Mark!
Thanks for your comments. Hopefully I will have the article updated with more info by the time you start your work.
I’m curious why your opted to get a 690 instead of adventurizing the 500 EXC? I’m asking this because I’ve been thinking of exactly the opposite. Don’t get me wrong, I love the 690, but shedding off 30 kg off dry weight will make a big difference in technical ground. What’s your opinion on the 500 EXC as an adventure bike?
Hey Man,
The 500 is a great bike dont get me wrong ( I do plan to get anther), prob best I have had for trail riding and endo, just lacks the legs for longer runs, prob the biggest drawback is the oil change intervals for the 500 at 15hrs, but you could increase the oil capacity. I have had a ride on a 690 (without luggage) and they handle great. Previously had a Tenere’ it was a pig. I think the killer for the 500 is the amount of gear that you need to take, but I have done a few overnight rides staying in pubs and thats fine. Have a look at MOTONOMAD where a couple of guys did some serious kms on 500s. what sought of weight you carrying on the 690?
Yeah, I found the oil change interval being a big vote for the 690 against the 500. The interval on the 500 is about a fifth of the 690? Then again 30 kg is a lot of weight and you could carry more oil with a smaller total weight. How much can the oil capacity of the 500 be extended?
Motology Films is a great crew, and inspired me to have a look at the 500EXC. They have some seriously beautiful content on their channels. The 690 handles great, but on extremely technical terrain the weight becomes an issue. It’s a fantastic adventure bike but the 500 is superior in enduro terrain. A double edged sword.
On ED14 we had over 30 kg of luggage each. It was mostly spare parts and for the next big ride I will take significantly less, as nothing really broke on the 690. If prepped and serviced well, it will keep working. I’m hoping to slim down my luggage closer to 20 kg, but it might be difficult. Especially the chain and sprockets are very heavy.
Yep I agree the book says 15hrs but could be extended, motonomad guys mentioned 2 oil changes for the 7000, a lot to do with type of riding and not a big issue if it is majority on the road, i suppose. did toy with idea of bolting a oil reservoir on the 500 to increase the capacity.
Luggage option would be more loop type, have you used giant loop Coyote type bags, as opposed to soft panniers, how did you find?
Okay, sounds interesting.
I’ve only used the Magadans on the 690 and some general roll bags on other bikes. I was looking into the Coyote too as an option for the 500 EXC. It might end up getting the centre of gravity pretty high up though. I like the idea of not having a rack though. It would cut down the weight and take out one possible fail point. I’ve been considering this for the 690 too.
I take it you’ve rolling with the Coyote?
I’m a little late to this but figured I would chime in as I’m in the middle of a similar story. I am riding from the northeast of the USA to Guatemala next week and have been prepping my 2007 KTM 450 EXC since November. I know that riding a dirt bike is considered crazy by most, but the light weight and durability of the bike really appealed to me, especially once I get to Guatemala. I’ll be living there for 5 months and will be exploring the mountains on the weekends. I wanted something that would be fun to play with up there.
For luggage, I was initially between the Giant Loop Great Basin bag and the Wolfman Dry Expedition Panniers. I bought the GL Great Basin, stuffed it and test fitted it to the bike. My thoughts were that I could get away without a rack system, easy on/off while traveling, and robust construction. Once the bag was fitted, I found that the giant U zip was not very smooth, and if I had to access things at the bottom of the “legs” like tools or spare tubes, I would have to dig them out because there’s only access from the top. (single compartment). Another big drawback is that it’s not waterproof. Sure you can pack things in ziplocks plastic bags and the “dry sacks” that come with the GL bag, but it’s just more fiddling. The biggest problem was the fit. The Great Basin bag, 60L, is meant to fit to a bike with passenger pegs (don’t have any on these dirt bikes). I tried strapping it down to the frame near the kickstand mount and footpegs and found that the bag didn’t fit tightly to the bike. I contacted GL and they said that the Coyote bag was made for dirtbikes. I could have gone that route, but I really wanted something waterproof, easy access, and smaller compartments.
I returned the Giant Loop and bought the Wolfman Dry Expedition Dry Panniers. Fortunately, I have a friend that is a welder by trade and we have been coming up with a lightweight rack system for these bags. I’m happier with these as they’re waterproof and I can compartmentalize my equipment so I won’t have to dig through all of my gear whenever I need one thing.
For the 500 EXC, you would have the option to get a fully made rack, like the one made by Gloetrottin. That thing is sweet and has a slim profile.
In terms of service intervals for the bike, I did a ton of research and discovered that with an oil cooler, you can comfortably get 1000 miles between oil changes. My capacity increased from 1.2L to 2.1L. I also had the valves changed on my RFS bike from titanium to stainless, as the SS valves don’t need as much adjustment and are more durable. I am not sure what comes standard on the 500, but it seems that a lot of guys are putting high miles on these engines without too much fanfare from the valves.
Another thing to consider is adding a cush hub. The 690 comes with one, the 500 doesn’t. I had Woody’s lace up a cush hub for my 450, which provides some peace of mind as I’ll be on the roadways for a lot of my travels.
Great site by the way. I came across your trip in Adventure Rider Magazine and it brought me here. You’re living my dream.
Safe travels.
Hey ThirtyOne, thanks for your input! I’d be really interested to hear how things go with the EXC in Guatemala. With the modifications you mentioned, I think it will make an incredibly light yet powerful adventure bike. Do you have a blog or a thread in ADVR or something?
Hey. Yeah you can find me here: https://gprtw.wordpress.com. I just got to Guatemala this past Thursday. In total it was about 2,500 miles. Definitely some things that I would do differently next time around! What year is your 690? I am thinking about how I would change things if I were to repeat it this kind of run and a 690 with some kind of rally kit (wind protection and more fuel capacity) is one of my thoughts. I don’t foresee myself tackling the kinds of situations that you got yourself into in Siberia! I would love to, but that’s beyond my level of adventuring at this point. So having an extremely lightweight bike, while is the biggest goal, has its tradeoffs. I think I would be willing to sacrifice some weight for some windblast protection and comfort.
Any thoughts about those rally kits out there? Basil and Rally Raid and HARDkits? (Other than the fact that they’re EXPENSIVE) Build quality aside, thoughts on the added protection they offer for distance riding. For example, riding my dirt bike across the USA on highways for a little over 1,000 miles beat me up pretty good.
Hey ThirtyOne. Thanks for the link, I’m loving the writing! Also more than a little jealous of your current adventure. My 690 is in pieces in Helsinki, so I’m making do with road cycling around Berlin. Not that it’s a bad thing, there are plenty of abandoned Soviet treasures in the periphery.
Anhyway, my 690 is a K13. I’m really happy with it as it is the last version without ABS brakes. It’s still very heavy compared to your EXC450, which IMHO would be a great option for the technical stuff in Siberia and Mongolia. Having said that, if you’re set on riding long stretches on bigger roads, the 690 packs enough power to keep the riding interesting. For the technical stuff all that power is useless though.
The truth is I’ve never owned a bike with a fairing. All my street bikes were naked too. I appreciate the comfort the fairing adds in fast cruising and especially the reduction in wind pressure when riding fast on the pegs. Also the navigation setup would be a lot better as opposed to using the clamps I have. I’m sure the GPS is much more easily viewed, when it’s high up on the fairing.
However, the biggest issue for me is that I like a clean cockpit. I love riding on the pegs and seeing nothing but the terrain flying towards me. No fairings, no mirrors, nothing. Just the trail and the scenery. It feels like flying.
Also, in technical terrain it just seems like a fairing would get in the way and I’d probably keep banging my face into it. Not to mention that they make the bike heavier and raise the centre of gravity. I know that I’m pretty much alone with my views and don’t want to give the impression that I frown upon them, because I don’t. Your bike is an extension of you, and only you can decide what works for you. So there really aren’t too many rights or wrongs with these things.
So I really couldn’t say too much about which model to go for, as I’ve never really looked into them. I guess I would start with Rally Raid, as I already have their front and tail tanks fitted. In addition to the ones you mentioned, be sure to check out Perfect Fairings too (http://goo.gl/gIQkvS).
So lots of words, with very little substance. I’m starting to sound like a politician 🙂
Wishing you an awesome continuance on your adventure. Be safe, mate.
Hey, at least you’re sticking to two wheels!
The adventure to Guatemala has been great thus far. Thanks for the feedback on the blog. It’s a little bit of work to keep up, isn’t it?
I had very mixed feelings about weight vs. comfort when I came to selecting the 450. I had some experience on my 250cc Honda Tornado in Honduras and spent some time riding in the mountains. That bike weighs in at 320lbs dry and when I saw that the KTM was 250lbs dry, AND it came with a kick-start I was sold. The added HP was also a nice bonus. I imagined riding a lighter bike in the mountains and that’s what completely sold me on the package. I’ve only ever owned naked bikes, so it’s what I’m used to, as well. But, what I’ve found is that my riding in this part of the world has been pretty much 99.9% pavement. I found some trails last weekend, but a majority of my riding will consequently be on pavement. So bigger bike, more comfort, more wind protection…it’s a natural decision I suppose. Also, I don’t have any passenger pegs which means I can’t take any pillions. I suppose the small things add up.
I see your point of view about getting a bike before it gets the electronics. I know in 2014 they switched to electronic throttle on the 690 along with some other “goodies”, which, for me, things I’d prefer not to have. For some of those things, there is no easy fix. My buddy’s electronic throttle by wire went out on his Tiger 1200 and the bike was stuck at wide open throttle. Then the entire electronics system permanently died when he hit the kill switch. Triumph had to send him a brand new bike!
Anyway, best of luck putting your bike back together. Thanks for the tip about the other fairing company. I might be headed out to France to do a trip east in 2016. Perhaps I’ll follow some of your tracks.
Safe travels.
Yeah, blogging is sometimes tough. Especially if there are a million other things to do. 🙂
That is some bad luck on the Triumph. Good thing that they came through thought with the new bike. There are some horror stories floating around, involving certain other bike manufacturers and electrical faults…
Good luck in Central America and let me know if you need any tracks or POI’s if you’re in Europe.
Keep rolling!
Hey Hobo, we last chatted in Jan this year, I was looking at a 690 after selling my 500. Well I couldnt find a decent 690 and no new ones available, i ended up buying a 6 day 350, what a gem, have recently sold another bike and the 690 is back on the agenda. have you done anything with adventurising a 500 or have you stuck with the 690, hope all is good, cheers Mark
Hi Mark, the 350 is a sweet bike! I’m still on the 690 but getting close to pulling the trigger on a 500. Last summer in Eastern Europe was definitely the last straw in the decision to go lighter. Some of the trails in Romania and Macedonia were brutal for the 690. An excellent ride though.
Anyhow, wishing you good trails and let me know if you end up going for the 690. Cheers!
Hi,
like to know if those things you change to your Enduro R will work on the SMC R?
I read that both the SMC R and Enduro R are twins with one on Trail wheels and the other on SM wheels..
With the Fuel tank on the front, does it change the handling of the big making it hard to handle??
Thanks
Hi Patrick,
Many things on the SMC and Enduro are identical, such as the frame and engine. Like you said, they have different wheels, but also brakes and chassis are different, along with many other things. I’m no expert with the SMC, but I’d expect it to have similar performance upgrades to the exhaust and air box as the Enduro. Many things on this list can probably be installed if you find them useful.
As for the front fuel tanks, they do make the bike more nose heavy. The thing is though, that with luggage, the Enduro is pretty tail heavy so the front tanks compensate it nicely. Another option would maybe be the Rally Raid rear tank and a Rade Garage front tank if you want to keep the bike slimmer. It would give you an extra nine litres, for less money than the Rally Raid EVO 2 front tanks only.
Are you using one or two rim locks on the rear? Great job on your blog, I find it very helpful. I just sold my WR250R so I could get my 690, no complaints so far.
Hey Blackdog! Congrats on the new bike. I’ve used a single rim lock on both wheels, with spoke weights for balancing. Seems to work and less hassle with changing tubes as opposed to two rim locks.
Enjoy the 690!
[…] built 690 K13's. "The Hobo edition", if you will. The full story on preparing the bike is here. The bikes performed very well with issues being limited into leaking fork seals, that were easily […]
So I can’t attach any pictures to the comments but I have started to modify my rally raid racks after reading your account as well as others having the same mounting point break on the bottom.
In my opinion it was too thin already. That along with a lack of triangulation was asking for trouble. I have welded a piece of flat stock around the outside of the mounts so that they are (hopefully) much stronger and less prone to breakage!
I posted some pics in the 690 luggage and rack thread on advrider if you are interested
Hey Jim, I had a look at the ADVR thread. Nice work, please keep me posted how it works out.
Anyhow, the bottom line is that there is a problem with the current setup of the racks. The lower eyelet in the front mounting bracket broke on all four racks on the two bikes. I think the problem is that the diameter of mounting bolt cap is very small, essentially applying a lot of pressure on a very small area of the rack. As you pointed out, the rack does not have a triangulated rigid construction, which will leave the front mounting point susceptible to motion induced stress fatigue. Especially on single cylinder bikes. Eventually as the rack vibrates, stress fatigue creeps in at the pivot point, ultimately resulting in the frame cracking. The cracks appear above and below the bolt cap, perpendicular to the general alignment of the rack tubing.
The rack was designed to allow for some plastic deformation upon impact. If the tubing was stiffer, taking falls would result in weld seams cracking or potentially catastrophic damage to the top mounting points on the tail of the bike. In my kind of riding, taking falls with luggage on technical ground is more or less a recurring event. I really appreciate the racks being somewhat yielding. The rack absorbs a lot of energy that would otherwise be applied to luggage or the bike. The downside naturally is that the rack vibrates with the discussed symptoms. The rack also needs to be bent back to shape after falls or it will ultimately end up making contact with the swing arm.
I’ve discussed the issue with John at Rally Raid. He said that a larger diameter washer between the bolt and the rack to distribute pressure to a larger area might do the trick. I don’t know if they are now adding this into the rack kit. While this should help, I think another washer should be placed between the spacer and the rack on the engine side of the rack. As with most things in adventure riding, there are no perfect solutions and everything needs to be tweaked according to use and rider preferences. That’s what makes this such a wonderful discipline 🙂
Ride safe, buddy!
It also seems to me that the bracket itself should be “flipped” so that the spacers are eliminated. Having them there just created more leverage on the bracket and in my opinion will only exaggerate the vibrations over time.
I definitely agree with you on having a big washer and that’s also in my plans, I think that I’m actually going to purchase new bolts that are a few mm longer as well so that they can go further into the mount on the bike as well as take a washer under them. I think the current bolts wouldn’t have enough threads to take a washer and actually do much “bolting”
I agree, it makes it a lot less rigid the way it is. I’m pretty sure though, that Rally Raid had a specific reason for going for that design. They usually test their stuff meticulously.
I think the heel plate, with the thread for the rack bolt, is quite thin so the the bolt needs to be sized correctly if you add the washers. It’s aluminium, so too much torque, and the thread is gone. Furthermore there is not enough space to add a nut on the other side of the heel plate, which would be the perfect solution. Don’t forget to use lots of thread lock as the bolts tend to loosen and fall out. There’s a tale of woe regarding this issue on the next day of the ED14 report. I think I will drill the caps and add lock wire on mine.
Looking forward to the next posting to hear about the woes! It’s not an adventure until shit starts to go wrong!
I’m finished with one side of the racks and have posted some more pictures to the thread if you want to see what the end product looks like.
I’m really happy with it and I think it’s a huge improvement over the original fabrication.
I was also thinking about what you said with putting a nut on the back of the bolt and it would definitely be possible on the bottom bolt, although not on the top one.
Could still be worth it though as it would guarantee you wouldn’t lose that bottom bolt.
Definitely a good point about the thread locker. Have experienced that one myself….
Also, I take it back. You could only fit a nut onto the bottom bolt on the right side but not the left. Oops!
The reinforcement looks great. I will have to do something about my racks too before summer. Please let me know how they hold out.
I thought there was some reason for not being able to bolt through. Can’t have enough thread locker on thumpers. It’s a standard item in my travel toolset 🙂
Got some new bolts.
Rally-raid supplies m8x30 and I replaced with m8x35 along with m8 fender washers. There’s no protrusion on the backside from the longer bolt which means that there is more thread contact so that’s definitely good news! Took some pics to see the contact area from the supplied bolt compared to the new ones and it is kind of mind boggling that they didn’t come with washers originally
Awesome, be sure to check for cracks under the washers regularly 🙂
Nice looking bike BTW!
Will do! Although with the reinforcements I’m hoping that crack are much less likely. Hoping….
And thank you! I just need to get the 300 mm suspension and I’ll be done! For now at least…
hi there me again…
what are your thoughts about steering dampers?
i am setting my bike up, better said i am having it set up… i just dont have the time any more…
i bought a 690 enduro 2014. the guy that had it before was 195cm about 120kg. I am 176cm and 75kg.
he put lower footpegs and lifted the handlebar (i hope my english is english for other people to… :-))
so i thougt i keep that, for more comfort.
the lynx fairing should be nice for longer trips…
the only thing that i dont like so much are the touratech aluminium paniers.
instead i was thinking of getting the kriega bags that are attached very close to the bike.
are the magdan paniers wider than the handlebar?
cheers rene
Hi Rene,
Congratulations on the new 690. May it serve you well.
I have no experience with steering dampers. I’ve always ridden without them. Having said that, I’m currently looking into a Scott’s damper to add stability in rough terrain. Especially on rocky riverbeds and soft sand it may make a big difference. At least I hope so.
I guess you can always remove the riser blocks from the handlebar if you find it too high. I think the steering damper will need the handlebars raised a little anyway to fit the damper under the bars.
I also tried the Lynx fairing, but I couldn’t get it to work for me. I experienced a lot of wind buffeting, which kept hitting me right in the throat. So I had to get rid of it and I’m currently running a naked cockpit without a fairing. A lot of people love the Lynx, so I think it’s got to do with rider height and riding style.
I guess the aluminium, panniers are okay for road use, but I don’t think that’s what you had in mind with the 690? I think the Mags are a little wider than the handlebars, but not by much. Which Kriega are you considering? The Overlander 30 or 60?
hi mate,
thanks for your input!
i really like the bike. until now a had (and still have one) much heavier bikes
first i was looking at a husqvarna 501 maaaan what a fine bike!!! but the maintenance…
so went for the 690 i guess the better choice considering that i am not really a mechanic.
yes the handlebar needs to be higher. i am looking at the ralle moto rm2 sd…
i am corious about he lynx fairing
well think i have done enough roads so far, always went on dirt roads with my old kawasaki zzr1100. Yeah, i kissed the dirt…
but hey no pain no gain…
until i am at some dirt road where it is allowed to drive… well, one still needs to drive some time on the autobahn…
i am considering the Overland 30 (2×15) + the 20 or 30 on top. I like the system, that makes it possible to add or take of bags. And they are very light!
never seen them “live” but hopefully will see them soon at the MMD Adventures shop here in snowy switzerland. I let you know what i decided…
so far i only purchased protection for the rear break cylinder and the side stand thingy.
chain lubrication, chain guide and sprocket guard for next time.
do you think there are parts that you added just to keep your mind at ease? or did all that you added actually break? i am thinking of the tank sub frame bolts and the tank cap…
cheers Rene
Hi Rene, I think you will not regret going full dirt 🙂
When planning and building the bike, my goal was to protect potential fail points and add features that weren’t there. Nothing broke before adding the parts or upgrades. The bike was new when I started the first build. That was kind of the whole point. You prepare the bike to make sure it does not break. Just like with normal service. It is preventive work also. I admit that the list is pretty extensive, but I knew it would have to hold out for 20 000 km last summer far from civilisation. The bike worked fine so I was happy with what I had done. There will be new modifications on the bike before the next big ride though 🙂
I recommend the sub frame bolts, if you are going to carry luggage. People have had them break under stress. The filler neck is good in keeping the dirt out of the tank, when filling. Especially in muddy conditions dirt gets everywhere.
What are the other mods you’re thinking of doing? Or is that an article for the future?
Hi Jim, I’m still in the process of updating the current article on how the mods performed. The upcoming modifications will be minor for the most part.
I’ve been looking into a steering damper for more stability in rocky and sandy terrain. It will probably raise the handlebar a little, and I’ll probably add lower foot pegs for better geometry. I currently need to hang on to the handlebar when riding in the attack position at speeds above 100 kmh.
The single use oil filters will most likely be replaced with Scott’s steel filters. It will reduce luggage volume.
I will probably add another Montana 600 GPS for solo riding. One for the trail and one for the general view of the area. The navigation rack might need some updating, and I’d like to add a maps switch on the handlebar.
The electrical system will need some updating too. I would like the kill switch to do what the ignition key does now. It’s a pain to operate the key to switch off the lights and fan on shortish breaks. I’m also looking into adding grip heaters, but haven’t decided yet whether it’s a good idea or not.
The luggage rack will need fixing and maybe some modification. It’s pretty good, but still allows a lot of swinging of the Mags, when mounted nice and low. In general I will try to shed off some weight, but there’s not a lot that can be done about that except for carrying less luggage.
[…] – ADVrider If you do take the 690 best prep it well, the rolling hobo gives great advice on this Adventurising theKTM 690 Enduro R | The Rolling Hobo DRZ is a very reliable bike more so than the 690 but it is around the same weight and around 50% […]
Yea lower pegs are a must on this bike. I find the whole cockpit area to be really cramped though that could be that I’m 6′ 4″
I’m thinking about making my own pegs as there aren’t too many after market options out there.
Definitely let me know how the kill switch works out. I’ve been meaning to look into that myself as I find the key is in a bad spot when running a tank bag and I end up having to use my fingertips to turn it off.
Just picked up my ’15 model yesterday. Now it’s time to set her up and look at all your cool mods and upgraded.
I wanted to ask about a few of them.
1. My bike seems to run at quite a high temp, outside temp is +25 C. On the gauges, only 2 bars from max! So I’m guessing the change of thermostat will help? Anything else I can do to lower it. I’m planning on going to places with temps in excess of 40 C.
2. I really like what you have done with the front brake line. Was that an easy job? If you have any extra pics I would highly appreciate it as that is something I would really like to change on my bike.
3. How did the extra inner tube work in the tyres? I’m thinking of some thick camel hide as a liner.
4. Changing the Tank and sub frame mounting bolts. How many bolts do I need?
Finally, not sure if this is common, but I do notice a ticking coming from he engine compartment, especially in idle. Normal for this bike or just because its in the run in period?
I’m planning my first safari in her in about a month and so excited for it.
Hi Marcus,
Congratulations on the new 690. May it serve you well on all your adventures.
The bike temperature seems pretty normal for such warm climate. Both our bikes were running in similar temperatures in hot and dry Mongolia. We did have radiator screens and high fenders which reduce airflow to the radiator and its cooling less efficient. The 88 degree thermostat will activate the fan earlier, mine was running pretty constantly in hot weather. The best way to keep the bike cool, is keeping the radiator and possible screen and fender vents clean to ensure maximum airflow. Additionally, always shut off the engine when stopping. We did this even for traffic lights when it got hot.
The rally routing of the front brake line is great. It’s also a really easy job to mount. You can get away with using the original 120 cm brake line, but we used 127 cm lines due to the 300 mm suspension. I would suggest getting a 122 cm line from HEL or Goodridge. I can see if I find more pics and e-mail the to you.
The extra inner tube adds protection against pinch flats. I have no idea how camel hide will work. let me know how it goes if you decide to test it.
For the tank bolts, I recommend getting both the top and bottom sets. You can get both kits from rally-raidproducts.co.uk
Coming from Suzuki and Yamaha the ticking on the 690 drove me nuts. I got all paranoid about it and was sure the bike was about to die. I think everyone new to KTM experiences this. After asking around I was told that the engine is supposed to sound like cement mixer filled with large bolts. Having said that, if it keeps getting louder, it’s usually the tell tale sign of play on a rocker arm bearing. It’s usually the exhaust side. So I’m pretty sure the ticking is normal, but keep an ear on it and check the bearing clearances if it seems to get louder.
Have a great safari and do let us know where to find the ride report! =D
Absolutely fantastic writeup! I was kind of getting a little burnt out about guys beautifying their 690’s with rally kits and not addressing potential problems. I bought an ’08 and put in the rally raid cam chain tensioner as I found that as the oil neared its interval limit, it got too thin to keep the hydraulic chain tensioner tight. The noise it makes will scare the heck out of a person!
One question regarding your rectifier/regulator: I currently have a shorai battery in my bike and am curious if a MOSFET system and 14.2 amps will hurt the Shorai? Any insight on that?
thanks very much…again…fantastic job!
Thanks Chris! I’ve got the RR manual cam chain tensioner too, but haven’t fitted it yet.
As for the Shorai, if you’re using the LFX19A4-BS12, its charging voltage is specified at 13.1 – 15.2 V. Check out their product page.
Another question for you, if you don’t mind. I was wondering how you pulled the dust cover off of the bearings without damaging them? Mine are getting here in a couple of days and I have never done that before, but packing them full of grease makes a ton of sense. My first thought is to use a very small flat headed screw driver to lightly pry the dust covers off, but is there a better way?
Also, great idea about the brake line routing…I just ordered my new brake line from HEL. I have the stock suspension, so I went with 48.25 inches long. Can’t wait to get some visibility in the cock-pit..finally!
next on the list is to upgrade my rocker arms. Are there any improvements in the rocker arms that you know about. Seems like these are items that need to be replaced every 15K miles (24K Km). Any thoughts on how to extend the life of those? thanks again!
Hey Chris, I use a 1 mm micro screwdriver to pry the seals out.
I’m glad to hear you pulled the trigger on the brake line. I’d be very interested in how the 122 cm line works for you. If it’s not too much trouble, please keep me posted. Also, if there’s anything I can help you with, let me know.
I don’t think there’s much to be done with the rocker arms except monitor wear and replace with new ones when they are starting to go. According to KTM, the rocker arm was redesigned in late 2013. Hopefully the new ones last longer.
New part numbers are:
intake: 75036060144
exhaust: 75036061144
There are good images for identifying the new ones here.
Just put the new rocker arms in. I compared the old and the new and to the naked eye, I can’t see any difference. Perhaps it is in the bearing itself. I also finally installed the new brake line, but I am having trouble bleeding it. Did you bleed yours with a special tool? Putting new RR tanks on today as well a new KTM windscreen. Not as fancy as the RR rally kit, but about 1000 US cheaper!!
Hey Chris.
Did you have the ones with the cross or the dot on the bearing axle?
Yeah, bleeding the brake line is a bit of a pain. I didn’t use any special tools but it takes a bit of patience. The biggest issue is filling the line, no? Instead of pumping the brake lever all the way in, try flicking it at the out position. Keep an eye in the master cylinder reservoir for bubble formation and keep adding fluid as necessary. When you get the line filled up, just bleed it normally.
If it’s not too much trouble, could you post a pic of the bike with the fairing fitted?
Good luck with the brake line.
I don’t remember what the bearing looked like…dang it, but its the new part number, so it must be the update.
As far as the brake line. Well, flicking the tip…did the trick. brake line bled and workin’ great! thanks for the advice.
I’m not sure how to post a pic of the windscreen, so here is a link to the facebook photo album. Hopefully you can access it. https://www.facebook.com/media/set/?set=a.10100571025113294.1073741829.40308229&type=1&l=adabc056f0
My main goal with the windscreen is to simply protect the GPS and/or cell phone from rocks and debris. It might also help with glare, but I’m not sure. I wasn’t really looking for a solution to block all wind from my face…this is not a touring bike after all! I was also looking for a solution that didn’t cost me an arm and a leg. If I crash and the screen gets ruined, I’m only out $70 US. I can recuperate from that loss.
Next on the list is a LED headlight bulb from cyclops adventure lights and some luggage. I’m looking at Mosko moto for my luggage or Giant Loop…undecided for now. Thanks for all the help on your blog…I’ll keep reading. If you are ever in the Seattle, Washington, US area…shoot me a message.
Hey Chris,
Thanks for the link. The bike’s looking good! Nice crisp colour scheme with the white tank and orange shrouds. Glad to hear you got the brake bled. I second your comments about the 690 not being a touring bike 😉
Just out of curiosity, which models from GL and Mosko are you considering?
Good luck with the bike build. Don’t be a stranger if you find yourself in Berlin, Germany.
I am looking at the Giant Loop Siskiyou bags. Talking with Harold (the GL pres), he says they are rackless, which I am leaning towards. I am also looking at Mosko Moto’s reckless bags, which are not fully developed yet, but will be soon. Again, they are another rackless option. I also recently came across Alt-riders new soft bags, but I don’t know if they will fit a 690 (they look to be large and cover up the fuel cap in the back).
I see. I think Tolga (http://www.ridemustgoon.com/) was using the Siskiyou’s on his 1190. I’m not sure how you can get rackless bags not to get scorched on the silencer of the 690 though. Having said that, I would definitely love to lose the rack. I’ve been mostly happy with the Magadans, but they do need some modification and are in fact not fully waterproof.
I went to an even this past weekend and the Peter from Mosko Moto were there. Very cool dude who lives to ride and is very passionate about having the right gear for the right price. He firmly believes in the concept of just getting on a bike and riding and adventuring. He had their new recklas bags and they are amazing! They have put a lot of thought into every detail. fully waterproof, military spec materials, aluminum strap clasps and this ballistic nylon features as well as many adjustments to fit just about any bike on the planet…and for all intents and purposes appear to be bomb-proof and at a fraction of the cost of the siskiyou’s ($700 US versus $395 US). I pre-ordered an 80 Liter set and they should ship around mid June according to Peter. The bags come with an exhaust shield to protect them from the exhaust and both sides have a stiff inner wall to ensure they don’t interfere with the exhaust. The bags essentially are dry-bags that fit into shells that stay with the bike, which is nice. The dry-bags have a clear outer panel so that you can see your gear in each bag (which is great because I always forget which bag I put my stuff in). They dry-bags also have a pull system so instead of trying to cram the dry bags into the shell, you can pull them through, which is great so that you don’t compress your gear as you try to stuff it into the shell on the bike. Anyway, have a look at them: http://mosko-moto.myshopify.com/products/reckless-80l. I plan on getting mine, then doing about 1100 miles of dirt a week or two later (early to mid July). I can get you some feedback on my experience then.
Thanks for the info. Looks interesting, please let me know how they work for you.
Interested in up grade exhaust and air filter system for my 15 69o and how are if will effect mapping sensories is it possible to cut the end of the pipe and remove the heavy catalytic material weld the end back up and have no problems
Hey Tom,
I’m afraid I have an Akra can and map with the EVO-1 lid, so no experience with butchering the OEM silencer. Another Finnish 690 nut has done it though, so maybe drop him a note?
[…] http://therollinghobo.com/adventurizing-the-ktm-690-enduro-r […]
I finally got the MOSKO MOTO soft luggage today and my first response is simply wow! These things are made extremely well, packed with features and have clearly been designed by adventure motorcyclists! I will taking these out on the trail in a couple of weeks, but at 2/3 the price of the giant loop great basin, these bags are at least 2 times better in every imaginable category. Just can’t say enough great things about these bags. In my opinion, these bags are game changers. Hope all is well….adventure on!
Hi Jussi, curious to know if you’ve had any issues with heat generation with the double tubing of your tyres? What sort of ambient temperatures were you riding in? We are about to head off on a trip through remote northern Kenya and into Ethiopia and keen on the extra protection of a second tube but a little concerned about heat. We are expecting ambient to be low to mid forties were we are going so a little concerned. Love to know your experience on the matter.
Great write up too, thanks for sharing.
Cheers, mick and tan.
Hiya Mick! I think the highest temperatures were in Mongolia. Around 30 something most likely. I only changed the tube once in Siberia, and did notice some vulcanizing between the two tubes despite all the talcum powder I dumped in when fitting them. Nothing serious though and they separated without issues. Unfortunately I couldn’t comment on the extreme operating temperatures which you will be riding in though.
Loving your blog BTW and will be keeping an eye on it. Best of luck and have a great ride!
Great site.
What is the easiest way to remove the front shock guards?
Hi Michael, sorry for the late reply. I’m currently out riding. To get the shock guards remove front wheel and the fork legs. The guards will slide out from the top, once you unscrew the attaching bolts.
I’m planning a Portland Oregon to Tierra del Feugo trip in Jan 2015. What spare parts should I take? I’m thinking both rockers and a spare fuel pump/filter for starts. Thanks!
Hey Ron, sounds like an epic ride! Here’s a link to our spare parts for last year’s ride across Russia and Mongolia: http://therollinghobo.com/2014/06/spare-parts.html
We carried heaps, to be fully self-sufficient and not have to prepare caches. In the end I only ended up using the clutch as I toasted mine on a muddy section in Siberia. Other than that, there we no problems. After the 12.000 mile ride, only the bottom bearing on the RR Rallye shock was goosed. All wheel bearings were still good, but the right side swing arm bearings were mucky, but with a bit of cleaning up and new grease they were good to go. Mind you we had a lot of deep water and rain.
I’m currently riding solo for a month in Eastern Europe and have more or less the same set of spares as above. Haven’t needed anything yet except tubes, but my speedo stopped working and Rally Raid rear tank started leaking. Other than that the bike is running good after 3.000 miles.
Wishing you an excellent and safe ride.
I am using you’re same setup for nav on my 690 except I oped for a cheap black and white high contrast Garmin instead of the Montana. I love the montana and think that singularly it is the best handheld GPS bar none but I wanted a clear track to follow with zero other graphics or distractions in the heads up position. For more complex navigating and counting I placed an iPad mini in the map window of my tank bag for off trail navigation decisions. I got the same S2 BD lights but can’t see from your pictures how you mounted them to the nav bar. Could you please show me or describe what you did to nount them, besides the deeper bracket. Thank you.
Hiya,
The iPad must be great for the overall view. As for the Baja SII, I mounted the light bracket on the top bolt of the RAM mount clamp. It’s been on for almost 30.000 km and seems to be holding. The OEM bracket can be a little tight, so you may need to fiddle around with it. I just fabricated another bracket from steel.
[…] read MORE […]
Excellent work with everything you’ve done and are doing with the 690! 🙂 I bought a new 2015 690 last April and the biggest issue I have had concerns a wobble in the front wheel at speeds over 60 mph. Have you ever dealt with this? Wondering if you might have any ideas for me. Thanks, again, and keep riding!
Hi Jimmy, good choice on the bike! Sounds like a tyre issue perhaps. What type of tyres are you running and at what pressure? My MX front tyre tends to get pretty wobbly at speeds over 100 if on tarmac. On dirt they’re fine at that speed… Gets better when they wear down a little.
Hey – I’vw just fitted the Tractive Rallye shock to my Basel 690 – have you kept the same side stand or have you made a longer one? Mine seems to be leaning over a long way!
Hi Piers, I think you’ll like the Rallye Shock. It seems to suck up pretty much anything. I’m currently using the standard side mount with an foot extension plate, which lengthens it by maybe 5 mm. It is still a bit short, but only when parking on flat tarmac. Most of the time you’ll be parking on less than level ground and will be able to find a spot that works with the shorter side stand.
If you do end up extending it, please let me know how it goes.
Did you changed Triple Clamps after Fork Extension and Tractive Rally shock as well? I’m planning to install both and i have 2013 model with greater offset as older models were.
I was riding stock. If I did it again, I wouldn’t do the extension of the forks, but instead get a 250 mm Tractive rear shock only. In rally type riding the 300 mm is fine but the bike is really tall for technical stuff in that setup. For reference: I’m 180 cm with long legs and could get a foot down on one side only.
Hey, tell me about the handguards. Thanks
Standard KTM Powerparts aluminium hand guards. Product#: 760.02.979.000
Awesome tips for the 690 enduro.. Finally got my hands on a 2015 model yesterday..
Hopd you wont mind me following some of these mods.
A question though… i cant seem to find any spray on electric grease here only found the dielectric grease.. Noob question..Any tips on how to apply themas per your mods?
Thanks for the awesome tips..
Ryo
Thanks Ryo!
Congratulations on your new bike. Feel free to do any of the mods. That’s why they’re documented here. I would only use dielectric grease on spark plug boots, but I think it’s a matter of opinion. There’s a long discussion for and against on ADVRider: http://goo.gl/A7lU7A
Have you tried looking for contact cleaners? They’ll do the trick too.
I’m not sure I follow you with “applying themas”. Could you please elaborate what you mean?
Keep safe, keep rolling!
Rolling Hobo…
Thanks for the reply… oops that was a typo error from me.
Meant to type “… applying them..” lol
Thanks for the adv link.
Definitely will check out the contact cleaners…
Cheers..
Ryo
Hi! Really enjoy reading your site! I have a question regarding your rear fender… I read you bent it downwards using your heat fun. Do you have the second black plastic at the underside of the rear fender? If yes, did you heat them both at once?
Regards,
David
Hi David, I just bent the protruding part after the tail fairing. Check out this post.
Hi,
great write up. Im thinking of a few of these mods myself.
What do you find is the best way to clean your bike. I went on some gnarly clay trails on the weekend and it seems to have gotten everywhere. I spent 3 hours cleaning it yesterday but im still not happy its 100% clean. There was even mud up under the seat in the electrics case, Im worried about using water around here as I dont want to cause a short. Any tips?
Hi Lewis,
The best way to get a clean bike is buying a new one =D
TBH I’m not that fussy about the bike being squeaky clean. I don’t think I’ve ever cleaned it under the seat. I suppose a damp rag would be the best?
Hi there,
Beautiful bike. I have always dreamed of owning a KTM 690r.Fortunately I have taken the time to investigate about this bikes reliability for long distance rough riding. ( I Rode through Africa in the late 70’s, 2x USA, most of SE Asia and also 11000 miles through the toughest roads in India, so I do have a tiny knowledge about bikes and the engineering).
Some KTM 690r riders I have met along my travels, always seem to have had identical problems. Rocker arm damage, fuel pump issues, leaking front shocks, electrical wire breakage etc.
Don’t get me wrong, I still secretly have a infatuation with this bike. The engine is simple and has unbelievable power. No other single comes close. The bike is so damn light, and perfect for small, endless roads.
Anyhow, there is a KTM dealer here in Chiangmai (North Thailand where I reside), just 5 minutes from my house. I have visited them on several occasions to look at their bikes and dream about further adventures, like riding from Thailand to Everest Base camp in Nepal on this bike. (by the way,the 690r price here is US$20,300!!)
I am one of those guys, who inspects every little screw and question’s its integrity. ( must be the German gene in me).
Here is what I honestly think about the “Stock” KTM 690r.
Poorly finished bike. Many inferior plastic parts. Electrical wiring untidy…. a shamble. Connectors look like they were made in Bangladesh.
I see exactly the reason, why you have changed out so many original parts for better third party hardware. But at the already high price of the basic bike?
I was googling for hours, about any real hard evidence of somebody on this planet who has done some serious mileage on this bike, without any issues. Wow….somebody called “Noah” had just crossed the 100000 km mark. And now he is like a movie star on the KTM blogs! What? Is this for real? Last week, had my Kawasaki Versys serviced. An American fellow I talked to, changing out his front break pads on his aged KLX 250, had over 220,000 km on that little bike. Absolutely zero mechanical issues in all those years.
I am sorry to have gotten carried away and probably have you in a question mark right now.
Actually, the reason I am writing to you is, because I am still looking for a good excuse to purchase this bike. Someone with your KTM 690r expertise can hopefully, and truthfully convince me to do so.
Any positive input from you (to own the KTM 690r “without” changing 30% of its parts to third party), will be greatly appreciated
Thank you,
Regards Oli
Hiya Oli,
Sounds like you ride in pretty gnarly terrain! Many thanks for your long and intriguing question, I’ll do my best to answer.
I think we are approaching the issue of evaluating bikes from different perspectives. In the end it boils down to what you intend to do with the bike and which attributes are the most important to you. If you make an unemotional selection purely based on the aforementioned criteria, you will have the perfect bike for you. Unemotional decisions are hard though, especially with bikes.
My criteria, or requirements, back in the spring of 2013 were: a new bike, light weight, enduro capable, plenty of power, runs on 80 octane fuel and long service intervals. A good selection of after-market parts also had an impact. Anyhow, I don’t think I had any other options that would have met my criteria, other than the KTM 690 Enduro R.
The ability to do “serious mileage” on the bike was and is irrelevant for me. That would require serious road mileage or a multi-year RTW trip, for neither of which I have the time or interest. My passion is adventure enduro. The rides typically last 1-2 months and are no longer than a maximum of 20 000 km. I don’t tend to hang on to bikes for more than two or three seasons so they rarely go through more than 40 000 km in my hands before being replaced.
I think there has been a lot of noise about the “unreliability” of the 690. I was worried too at first when selecting the bike. The fact is that in adventure enduro everything breaks, especially if you don’t prepare for it. So spare parts are a necessary evil. Even if I was riding a bike with a flawless mechanical track record, I would always carry a pretty extensive spare parts kit. Basically any part that is critical to operation i.e. throttle cable, cam rockers, fuel pump, injector, regulator, clutch plates etc. Within reason of course. The reason in question being fuelled by paranoia and several run ins with Murphy’s Law. Having said that, I’ve had zero problems with the 690, except for a toasted clutch, which was of course of my own doing.
I believe in meticulous preventive maintenance instead of dealing with problems as the emerge. As the 690 is known for issues with the exhaust rocker arms, I keep an eye on them and change them often. Obviously this raises the running costs, but in the grand scale of things the extra cost of an exhaust rocker arm annually is insignificant. The upside is that you get to ride a 690!
I somewhat agree with your view on the stock bike, but with adventure enduro, all bikes straight off the production line are just the beginning of the story. I’ve yet to see any rider just pack his camping gear on a brand new bike and roll out to Siberia for three months. Everyone modifies their bikes according to their needs. So I too design my bike according to whatever requirements I may have and build it. It’s huge part of the fun and a good way to get to know the machine. That knowledge will come handy when things go sideways on some miserable muddy spot in the backcountry of the world.
The good thing with the 690 is that there is a good selection of after market parts. This is a big upside for customising the bike without having to fabricate every single part. I think Rally Raid Products is to thank for a big part of this.
My honest opinion of the 690, or rather of the version I built, is that it served me well and I loved riding it. I shared amazing adventures with the bike and it performed flawlessly. I will be forever grateful. Having said that, it no longer fits my requirements and is being replaced next week by a KTM EXC 500. But that’s a different story.
I wish you good luck with whatever bike you decide to go with, and many incredible adventures.
Hey,
Just wondering how many you went through on the 690? In the whole time you rode it, did you encounter any serious problems? I’m too thinking of being a 690. I have a yz250 that I’m going to sell because it suized up on me. I want a reliable bike and really like the 690.
Hey Ricardo, I’ve done 40 000 km on my 690. I have had no serious problems yet, except for toasting my clutch in Russia, but it was my own fault because I slipped it too much. My buddy Juha aka The Walrus had some minor leaks on his fork seals, but a Seal Dr. tool fixed it in 2 minutes. I highly recommend carrying one of those if you ride in muddy conditions. Also, another good preventive measure is to never let wet mud dry on the forks. The dry mud is murder for the fork seals. But yeah, we’ve both been enjoying trouble free riding, but we both take maintenance very seriously.
Hi,
I’ve been following your blog and all the stories…and of course enjoying all the great photos !! at the sametime.
I got my 690 recently and you gave me inspiration for the dashboard setup, which worked out pretty good so far….(RMS bracket setup)
http://advrider.com/index.php?threads/ktm-690-enduro-owners-show-off-your-bike.624319/page-289#post-28896857
But i would like to ask you about re routing the front brake line….which looks like i will need to do that to be able to use this setup….and i was considering doing rally style…….But when the line goes under the headlight, does it create lot of tension ? specially with constant motion of the forks ? did you had any trouble, because of angle or anything?
Thanks,
_EG
Hi Emrah, nice looking setup! We’ve had zero problems with the rally routing of the brake line. I was originally worried that it’d snag on something, but during the last 30 000 km, no such luck.
We used 130 cm custom made braided lines due to our higher 300mm suspension. The banjos we in line with no rotation, but the top banjo had a 45 degree rise, I think. The standard brake line is 127 cm, so you can probably use it if you’re on 250 mm suspension. Provided of course that you get the sheath off in one piece.
When installing the line, have the bike on a stand and route it so that there is no tension anywhere when the fork is fully extended. You can adjust the loop position by twisting the line slightly, before clamping it down with the P-clips.
Hope this helps. Looking forward to seeing the results!
Thanks !! I’m gonna give a try on this rally routing,….I will post the result and final setup for sure….well, i dont think its too different from what you have…:) as i mentioned in advrider thread where inspiration came from 🙂
By the way, congrats on EXC (amazing machine) Im looking forward to see your approach towards adventurizing this machine and your report towards the service intervals…
Best,
_Emrah
Hi,
I have been reading your blog with a lot of interest and to be honest couldn’t wait for news regarding the lighter way of riding with the 690er or now the EXC. Did you think about adventurizing the Husaberg 570? It is an awesome bike that closes the gap between the 690 and the 500er in my opinion but with some more kg that the 500er. I liked riding this bike but familiar affairs made me driving an 1190 Adventure R. Now I am looking for an single cylinder; your 690er is not accidental for sale 😉
Hi Christian, many have suggested the 570 Husaberg, and it’s a great bike for sure. The reason I took it off the list was because it’s not in production any more. I prefer to start with a fresh bike, so I will know exactly what has been done to it and what to expect. The 690’s in Berlin; let me know if you’re interested 😉
Hi Jussi,
I would like to know your experience with your action camera by mounting on the RMS Bracket ? Isnt there too much vibration which basically makes the footage useless (at least on my end ) – I’ve tried different cameras, but mostly same result, specially in hirev situations….
Thank you,
_Emrah
Hey Emrah, If you clamp it directly to the handlebar it will vibrate for sure, like you said. I used several layers of rubber mat on the handlebar to reduce the vibrations. It softens it a lot. I suppose it’s a matter of preference; have a shaky helmet cam or a vibrating handlebar cam 🙂
Really good stuff here. Thank you. I am about to pick up a 2016 Husqvarna 701 enduro and after reading your blog, decided you would be the best guy I have found( so far) to ask about some mods for my new bike.
I have every ktm xcfw 250, 350, 450 and a sweet restored 06 525 RFS. I ride trails here in California and just wanted something to go exploring a bit farther with that wouldn’t beat me up so much on the pavement. So, this new bike will see maybe…..30% pavement.
Basically, connecting trails and fire roads. I would avoid or go around my favorite stuff knowing the bikes just too heavy. I would pack minimal gear as most places will have a destination in mind with all the comforts. Some unexpected over nights for sure though….
Here’s my take:
ABS dongle switch, Scott’s damper, titanium slip on muffler, big loop soft bags on rear, squadron HID light, rotor guard at rear, slave guard, mod those blinkers some how and cut that weird rear fender down. Comes with a certain amount of protection that I’d like to see before I go any further.
Again, really good blog here. Thanks so much!
Hi Rick and congrats on the new bike! Juha Salminen, the Finnish 13 times World Enduro Champion, tested both the 690 Enduro R and Husky 701 last year, and stated that in his view the suspension on the 701 is superior for off road. He also told about some hairy moments on steep rock slabs due to the ABS, so the ABS dongle switch is for sure a must for off roading. Sounds like you’ve got a good set of mods planned out. Just one question though, are you sure the Squadron is HID and not LED? I have the Baja SII LED spot and can’t recommend it highly enough. Awesome bit of equipment! Good luck with your build project and do let us know how it goes!
[…] read MORE […]
I didn’t read your complete blog but I wanted to mention this. I have a 2013 690. While planning a 17,000 mile trip from Portland Oregon to Ushuaia Argentina I read all the long distance trip reports I could and decided to take a spare set of rockers. I’m glad I did as I had a failure in Peru and had to replace an exhaust rocker in a hotel parking lot. After that I had no spares and worried about another failure the remainder of the trip. Always carry spare rockers. I now replace them every other valve check.
Also, I think the new 2017 bikes will have an improved engine with a differant head design. If that’s the case I’ll buy a new one in a few months. Now, what to get, 701 or 690?
Hi Chris!
Thanks for this big useful sharing.
I am in a 8 year trip along the 3 americas with my old motoguzzi.
When this experience will end i gonna start exploring asia with a new bike that MUST be lighter, solid and capable with the offroad.
I am more about 70% road 30% off and i am traveling with my girlfriend and 2 48 liter side luggages. I know other bike would fit better my need (like f800gs) but i really love the single cylinder of the 690 with his unbeatable lightness and hard frame. To me light=happy when i travel so i need to know how much can i transform this light, powerful and solid bike in something a bit morecomfortable, lower to the ground and capable of carrying 2 people + 80liter rear rucksack and the before mentioned side luggage… maybe is to far off the nature of this bike and i wanted to ask you.
We love to reach one place, leave the luggages, and explore the surroundings in on/offroading with the bike unloaded.
But we need also to cover hundreds of km between cities on normal road and with all our belongings, our trips can last months. We both work on internet selling images and writing articles for my country. So we live travelling in symbiosis with the bike…at least for many moths of the year.
To put in other words i need to travel in 2 people with 160 liters of luggage (side harbags + rear rucksack), sometimes offroad (unloaded of course) but i am not obsessed with it. I am more like a nomad who want a super light all around bike to discover the world instead of having fun with jumps and trails…i will go offroad but in order to reach some place or to explore, to pitch a tend and shoot the stars of the milkway, to live a couple of days with a farmer, to visit and abandoned town or to reach a secret entrance of a mine …not to compete not to run not to push hard in any way. I don’t want an old single like suzuki dr600 or yamaha XT… i like better the ktm. I don’t want neither another useless over 200kg bike.
I really love how light, solid and powerful is the 690, i feel it more like an extension of my body rather than many other huge unnecessary big bikes. So before moving to other models i would love your opinion if it can be transformed to suite my purpose of discovering the world. I know is more oriented to offroad but this purpose have made a bike super light solid and powerful and these are the features i need even if i am not that much offroad oriented right now. I was thinking on panniers capable to hold 2 48 liters luggage.. rear big aluminum plate to tie the rucksack, confortable seat, kuba lowering kit, additional tanks extend the fuel capacity, improvement to the light system. is it better to get a heavier and weaker f800 gs at this point?
Well, sorry for the long comment, you have great experience and you don’t see the bike like a religion so i trust in your advice better.
Hi Claudio, and thanks for your message. Sounds like you’ve got a very nice lifestyle going on 🙂
Anyhow, I’m probably the wrong person to ask, as I never ride two up and try to keep very light because I tend to stay on smaller trails and love the offroad action. In fact I just went from the 690 to a 500 EXC. 🙂
Having said that, I’ve heard about people riding two up on it. Some seem to like it and some don’t. Either way, if you do end up going that route, I recommend getting the reinforced bolts for the rear frame as they’re under a lot of strain riding two up and with a lot of luggage.
You can find them at Rally Raid.
You might find these threads interesting:
690 as only bike
690 – can it do Africa
I’m prepping my 2012 690 Enduro for Sydney-Paris next year and your article’s gone up on the wall of my garage as part checklist, part wishlist. Thanks for sharing the fruits of your experience.
Hi Grace, and congrats on taking on such a big ride! I’m sure it will be an epic adventure. I’m glad to hear you found the info useful. If there’s anything else I can help you with, just ask and I’ll do my best to answer. Keep rolling, keep safe!
Hi. Just curious to see how the build on the EXC500 is going (I didn’t seem to pick up the page anywhere even though mention was made of it being started in March). I guess it’s too much fun riding the bike!! I am split between it and the 690 and am wondering whether the weight is such a difference at the end of the day after you have had a bit more time in the saddle of the 500? Do you have any stats on the current weight of your two setups? Also wondering about the oil change and countershaft issues on the 500 and how you plan to circumvent that. Great site with amazing photos! Ciao d
Hello, thanks so much for sharing your experiences!
What were your impressions of the Heidenau K-60 tires as a 50/50 tire.
I noticed you only tried them once and didn’t use them again.
Sorry, jumped the gun on the submit button. This is Snellvis.
Hey Jeff, I actually used them again last year for a 900 km tarmac ride back from the Crimson Trail. I must admit I have very little experience on DS tyres though, as I usually ride with an MX tread. You’ll probably find more informed opinions in ADVRider.
For what it’s worth, the Heidenau K60’s perform as expected on wet/dry tarmac and dry hard pack, but have very little traction on wet clay, grass or mud. They seem to wear pretty well, so that’s why I prefer to use them, when I have to ride tarmac.
What are you riding BTW?
Hi RH, honestly I’ve always been a street / track rider and recently did a dirt training weekend in Hollister CA and loved being on a dirt bike!
I’m looking for a KTM 690 Enduro ( used) and have begun to plan some trips of the 50/50 sort. Nothing crazy to start with but eventually want to do all or a portion of the Trans American Trail with some buddies. Have a lot of experience camping so the light weight gear isn’t an issue… just have to get more hours off the beaten track.
Your site has really inspired me. Thanks!
Snellvis
Hi there, great page, thank you so much for putting this together.
Two questions, how has your external fuel filter, that one between the OEM tank and the injector, been working? I run in Colombia and gas is very dirty, I am about to have the same system.
Two, have you have any rocker arms failure or notice a problem with them? Any trouble with the cams axle or its roller bearing?
I ride a 2015.
Gracias!!!!
Hi Juan, the extra filtration seemed to work. The fuel in Mongolia was pretty rough, but neither of the two 690’s had any issues. Mind you the filters were pretty dark after the ride…
As for the rocker arms, mine needed replacing at around 30.000 km. Mine has a standard cam, and I’ve heard of the tuned versions going through the rocker arms quicker. The exhaust side goes first. It’s apparently due to it receiving less oil than the intake side rocker arm. You’ll know it’s time to change it when there’s axial play in the bearing.
Hi Hobo, im looking into purchasing a 2013 450 rally replica, with 80 hrs on the clock, for riding through South America, up to the north and perhaps across to Europe.
All im recievin is hate from the forums. I know its an oddball event but with regular servicing I think I can pull it off. What are your thoughts? I can give more detail if needed.
Hi Esteban,
Sorry for not getting back earlier. I was riding in the Balkans and got torn up in a crash, so the last few days have been a bit of a blur.
Anyhow, sounds like you’ve got a really cool project lined up! I wouldn’t be too worried about forum hate. It’s better to focus talking to people who know what they’re talking about. BTW, I’m not saying I’m someone who knows what he talks about, so be sure to take this with a pinch of salt and make up your own mind. 🙂
Either way, I’m currently riding a 2016 KTM 500 EXC, and couldn’t be happier with it. I decided to go with the 500, instead of the 450, as it’ more of a bottom end grunt engine and the the 450 is more of a revving engine. This is on a stock bike though, so the 450 RR will of course be completely different. I previously rode a modified 690, and while it’s a great bike, I would never go back from my 500. The lightness, gear box and engine of the race bike brings a whole new dimension to the trails you can ride, plus the confidence, that you can get it out of any mess if you keep the luggage light.
People keep telling horror stories about KTM’s being unreliable. There has been failures, as with any wearing parts. You just need to know what they are, and keep an eye on them. The KTM single is a very reliable bike if you take good care of it. IMHO this is the price you pay for riding such a highly tuned machine with plenty of power for the weight. If minimal maintenance is a priority, then a KTM single is the wrong bike. But for me it’s perfect, as I want something light and powerful, and don’t mind the service. I mean we refuel the bike every day and it takes like 10 minutes every day at the gas station. What’s the big deal with a 15 minute oil change every week?
BTW, I dropped the oil from the 500 after 2400 km and it looked a bit too worn for my liking. Then another drop after 1400 km again, and it looked almost like honey. So I’d say for my riding once a week or 1500-1800 km should do it. Air filters and fuel prefilter always with the oil, and it should be good.
Anyway, I hope this helps. If you do end up going the 450 route, please keep me in the loop with how it goes.
Hi,
Thank you so much for sharing experience/mods of your 690.
I have already applied a lot of your mods :0)
I currently preparing a trip to Mongolia and BAM, RoB in 2017.
Regarding the TM chain guard and the Osco: How did the OSCO perform? Did you use the tube and provided guide to shorten the distance between the oil nipple and chain (inside the TM guard) and at what distance? How long did the wear pad of the TM chain guard survive? Hope not too many questions…
Regards/”Hälsningar” from Sweden
Patrick
Hi Patrick, thanks for your comments. Sounds like you have an epic ride ahead of you, congratulations!
The OSCO works very well and I switched it from the 690 to my 500, so it currently has about 45.000 km on it.
The mount on the TMD chain guide is pretty perfect, as it drops the oil on the inside of the chain. I just drilled a 2 mm hole through the chain guide and a widened the hole a little at the top to make room for the mounting on the nipple. As I recall, I cut off the bottom nipple entirely, so it was essentially just a hollow bolt with one nipple on top for mounting the oil line. I used some generic fuel line to run the oil hose from the OSCO in the front of the bike to the chain guide in the back. The fuel line was secured to the nipples with a twisted steel wire crimp. If I’m not mistaken, the inside diameter of the fuel line was around 2-3 mm. You can see the mount here:
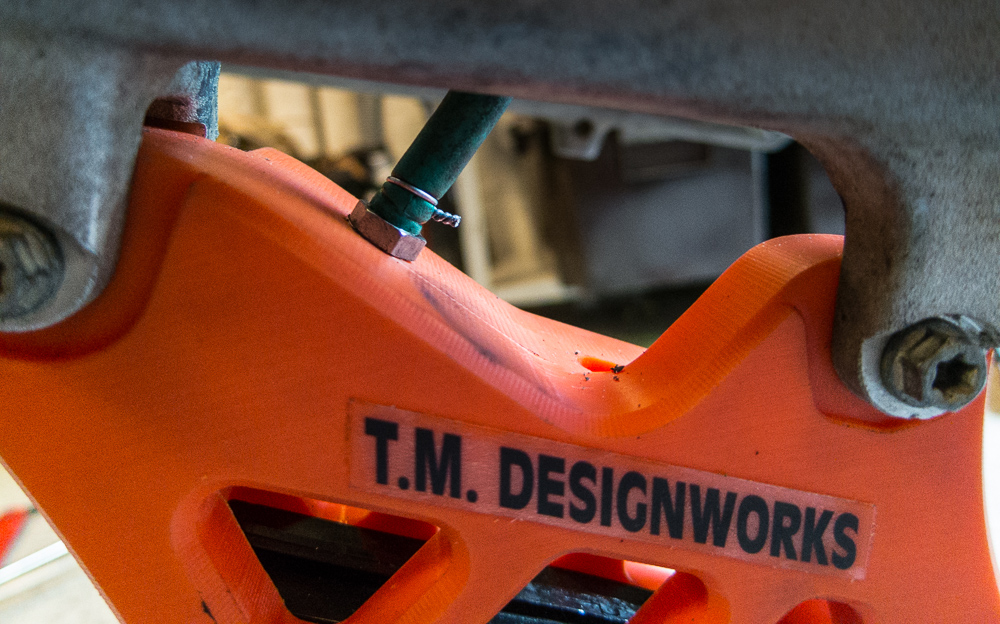
I replaced the slide on the TMD guide after 35.000 km when I moved the chain guide to my 500 EXC. It was still in ok shape, but I decided to put in a new slide as they are cheap. The replaceable slide is an excellent feature, but you will probably not need to carry one on your ride to the east.
I hope this helps, let me know if there’s anything else I can assist you with.
Thank you!!!
Sounds like a solid adventure there Patrick!
What time are you leaving and how long are you going to be out for? Me and a buddy are doing a similar trip in April: Crimson Trail down to Iran, then Mongolia and back to Sweden through Siberia and Russia. We are considering the BAM and RoB as well.
Hade varit kul att snacka vägar och sevärdheter !
Kör hårt 🙂
Sorry – missed your reply. June Mongolia July Siberia
write to padorato “at” mac dot com
Hälsningar
Patrick
Jussi, can I ask what fuel filter brand & specs you were using on the main fuel line (after the fuel tank & pump, but before the injector)? I have an aftermarket stainless steel inline filter in this location on my 690 which I need to replace, but I can’t get a part number off it and so am unsure of specs (handiwork of the previous owner). All the inline filters I can get my hands on in Australia seem to be for carburetted set ups, but as this filter is after the fuel pump I’m wondering if I need to be getting an FI rated filter? Any thoughts much appreciated.
Hi Grace, after the pump it’s advisable to use an FI rated filter. I use the OEM filter which is a Mahle KL15. The KTM part number is 81207090000, but that is for a filter kit including all sorts of unnecessary things for a pretty high price, so maybe have a look on eBay? I replaced the fuel line quick connector beneath the seat with the filter. Is that where yours is too? It’s handy to have a transparent filter to monitor its condition. When the one under the seat seat starts to get grey, the one after the fuel pump will be really dirty. I prefer single use filters over washable e.g. Golan microfilters or equivalent, but that’s just a matter of personal taste. Best of luck!
Hi, such a great write up and adventure 🙂
I’m thinking about getting the Tractive Fork extensions (250 to 300mm) and rally shock for the rear. Any more details about the revalving needed to make this work better? (a lot of theguys usually do the EXC or SXF fork wap and chnge springs to 4.8Nm)
Thank you and Ride Safe!!!
Sam
Hi Sami, the valves on my fork were done by a Finnish suspension guru who did all suspension for our top riders in the world cup. I only asked for more progression and plushness up top, which he sorted. I have no idea what he did with the forks, but they turned out pretty good 🙂
Good day!
Can you write about engine rpm with 15-16/50 sprockets when you ride 110-120 km/h?
Thanks a lot
Hiya Gleb, for the life of me I can’t remember the RPM’s. Take a look at Gearing Commander, it’s a great tool for figuring out gearing and the RPM’s.
Hi RH,
Is the fuel filter you added between the main tank and injector something specific or just a generic fuel filter?
My 690 has currently done 15 000km’s without any issues besides a battery than needed replacing but I believe I need to take some precaution against the injectors getting dirt into them.
Thanks
Brett
Hi Brett, sorry for the late reply. I was out for a ride, and could not reply to comments on my phone. I use the OEM Mahle KL 97 fuel filter, the KTM part is 81207090000, which includes the whole kit. You can probably find just the filter for a better price online. Other filters work too, as long as the nozzle diameter is the same. Also be sure the filter can handle the high pressure of fuel injected fuel line. Carburettor filters might not hold.
Hi,
which clamp on spoke weights do you use? I cant find something like this. Because i keep loosing my glue type weights every other ride…
Thanks and roll on!
Michael
Hi Michael, I use reusable spoke weights. Admittedly they can be hard to find in Europe. Maybe send an FB message to these guys? http://www.snellmanstore.fi/productfi/rengas_tarvikkeet-404/pinnapaino5kpl25g-14931.html
Thank you very much!
Excellent and helpful post… I am so glad to left comment on this. This has been a so interesting ..I appreciate your effort..
QUESTION:
1. is it worth upgrading from from 2012 model – no ABS to later model with ABS or Husky 701
2. what attachment can Ii use to attach front spot lights onto front forks and where can one get them
Hi David, I don’t have personal experience on older models, but they say the newer ones vibrate less. Especially the new 701 Husky. I’m not a fan of ABS on dirt bikes. As for the lights, I wouldn’t connect them to the forks as they’re right in harms way there. I had my Baja LED spot mounted on a tally clamp above the dash.
Hi Hobo!
I am currently going through the whole bike after returning home from a 6 month Europe to Mongolia trip. Your blog is just short of a bible in this regard, and is much apreciated. You mention cleaning and regrasing of swingarm bearings. But how would you get the swing arm bolt out in the first place? I have tried everything from mallets, huge hammers, heat and week long penetrating fluid soak, but the eaxle still wont budge. From the exploded views I have seen, there should be no circlip or locking ring to retain the axle other than the two bolts at the axle ends. Am I right?
Question 2: The shock upper bearing/heim joint parts number is missing from all exploded views and I cannot find any reference to it anywhere. How did you extract it, and change it?
Many thanks!
The axle finally came out with huge hammer and heating of the engine case with butane burner. Lesson learned, next bike, no linkage and more regular attention to bearings.
You beat me to it. Sorry for the delay, but glad to hear you got the bolt sorted. Fully agree on the linkage 😉
Hiya, I’ve actually been keeping and eye on your Mongolian adventure. Respect!
Did the shorter screw on the other side have a lot of corrosion? Shock off, swing arm unweighed? To remove the swing arm bolt, I used a 3/8” socket extender and hammer to get it out. It helps to wiggle the swing arm a little from side to side. Sounds like yours is pretty well seized? You’ve hit it with force?
Concerning rear shock, I had a Tractive rally shock, which went to their service. As for the top bearing, are you sure it’s not the same one as at the bottom? The bolts are the same, so if it’s the same width, it’ll probably be the same part (#R15006 on a 2013). You might want to check with the local KTM service though.
Thanks. Much of the inspiration for the trip and going motorcycling offroad did come from your blog. I wanted to stop by in Finland and get you some beer on our way home, but resilient stomach sickness and friends in Sweden motivated me riding straight to the Klaipeda ferry from Nizhny Novgorod. It took one and a half day straight riding haha.
There are some corrosion, I will be sanding it off and cleaning up the bearing holes with a rotating wire brush. We did the trick with wiggling the swing arm from side to side (shock off and unweighted), and wandered if the axial play was supposed to be there. I am reassured you had it too. Yes, the bike took some pretty big tumbles. I am impressed that the 48mm fork’s runout are still within hundreds of millimeters. My friend had some centimeter there haha. Also his wheels could be seen going in different directions by just riding behind him. No more riding on the throttle holder without hands for his sake.
The shock upper joint width is smaller and contrary to the lower bearing, the inner race is made in one piece, do its not possible to just separate it out both sides by striking the middle lip. I will ask the local ktm shop mechanics when they bleed and refill the shock for me if they know. Tractive would be the dream, but I am surprised at the rebuildability level of the standard wp suspension already.
Hope to see you on the trails some time!
Hi Hobo,
I am looking at mounting a Garmin Montana on a Touratech mount near the handlebar clamps. It looks like you have something similar for your lower Montana. Can you still see the instrument cluster over the lower Montana? Thanks
Hiya Marc, TBH I can’t remember the exact viewing angle on the 690, since I’ve sold the bike. But I’d imagine that the view was unrestricted, or I would not have mounted it. I hope this helps…
Rolling Hobo (Who Gathers no Bad Vibes),
Like you I have weighed the advantages of the 500 EXC-F and the 690 Enduro R. For the kind of travel you do the 500 is a good choice. If you do more paved surfaces the new ’19 Enduro R with the smooth motor (I have a ’16 Duke and that motor is incredibly smooth & the ’19 690 Enduro R will get it) makes sense. If you are doing more technical riding the 500 excels. I had a ’13 500 which I raced and rode on dual sport rides. It worked as advertised. It was certainly more uncomfortable if I rode it long distances on hard surfaces that you would experience with a 690. I now have a 450 EXC-F Six Days and it is simply incredible (re-mapped, de-smogged, reed cage yanked out, Akrapovic full race system on it) off road since cornering is so much easier on it than on the 500. It is not a good distance bike unless you are on trails in which case it is magic. On the newer 500/450 engines valve clearance is a thing of the past as they just don’t move much at all. As for oil changes, I ran 1,000+ miles on my 500 without bothering with oil changes using Shell Rotella T6 5W-40. The oil coming out looked about like the oil going back in. The new 500/450 engine (lighter weight, my 450 weighs 241 lbs. with some mud on it and with about 2 gallons of gas on board) will be able to go even further distances. I am currently using Motul’s 5W-40 V300 racing oil in the 450 & my 690 Duke. They strongly advise changing it at 3,000 miles (shear down issues). My 450 would do this easily. The valve adjustment issues has been solved by KTM. The oil issue is resolved by either Shell or Motul. The remaining issue seems to be one of comfort. If you are on solid surface most of the time the 690 wins but if you are adventuring most of the time the 500 excels. Perhaps we both need two bikes. Your blog has some great information! I would add that the parts you need for crash damage would be lessened considerably with a 500. I crash my 450 every time I go out or else I assume I am not trying hard enough. Damage? None.
Stu, many thanks for your detailed comparison of the 500 and 690. It seems that we are on the same page with pretty much everything.
Many thanks to you for your time and expertise gained from your adventures to put it all out there in this excellent blog!
I finally acquired a ’17 701E in 03/18 and I’m still in the midst of tailoring it to my needs and am having great ‘weekend’ mini-adventures with it.
At the time there was little advanced info on what might be happening with the future of the 690R.
Having recently reviewed the all new ’19 690R , KTM really did breathe new life into this model. If I could have looked into the future I very well may have passed on the 701!
The KTM group has and is continuing to up the ante in the motorcycling world ! Best wishes, Pete in USA
Further comments on the 450/500s. I purchased a ’19 500 3 months ago to use for dual sport riding with an emphasis on technical trails. Like my 450 it is de-smogged, reed cage tossed, Akrapovic exhaust & Pro Carbon (English) skid plate & pipe guard. To give it an edge for higher speeds I added the billet triple tree with the selectable 20 or 22 mm offsets. The 20 is used by desert racers for higher speed stability & the 22 for tighter, slower trails. Setting it on 20 eliminated the need for a stabilizer for me. I replaced the stock, locked ECU with a Vortex & a Vortex map switch. The Vortex comes with 10 maps. It also has three fuel trim rotating tabs on the back you simply reset with a cabinet screwdriver. When it got cold and harder starting I just increased the fueling from the stock 5 to 6 (like we used to do when we went to a larger pilot jet in the winter) on the low setting. It works great & “re-jetting” has never been easier. I left the overall gearing stock for smoother highway running. I added a Rekluse clutch to help in tighter terrain. I used the lightest springs in the Rekluse so it would hook up really fast. It acts like an anti stall clutch in essence. I added the Mako 360 handlebar clamps (for the standard mount, not the cone mounts) to reduce any handlebar vibration. With a soft Seats Concepts seat (a special order item) it is really comfortable for long distances. Oh, yes, I am keeping the ’17 450. It is just too much fun in the woods. In spite of the new engine I don’t think the ’19 690 Enduro R is in my future.
Your long distance travels and testing are excellent! KTM should have you on their payroll as a test pilot!
They actually make a filter sock for the Rally Raid filler neck now…
http://profill-australia.com/online-shop#!/KTM0002-MK5/p/103065400/category=28341010
I know you don’t run this bike anymore but lots of folks do and use this blog as a list for upgrades….maybe you could add this into the blog?
Thanks!
Hi!
I’m back now almost a year already from my trip throughout parts of Sout America. Nevertheless I don’t want to miss the chance to say “thank you!” for hints and tricks around the KTM 690. I bought mine brand new (the only vehicle I ever did that with and probably the last one too) from the dealership in late December 2016.
Beforde I rode the first kilometer I started to modify and improve her for our great adventure. And that was the point where your website was very helpful and full of information for me.
Want to know the features I appreciated most being made aware of? -Here they come:
– the Baja Designs light
– the Garmin Montana 600
– the paniers (which really survived a hard crash in Bolivia amongst others….)
– the fuel cap and filler neck
There where the major ones. And they helped me a lot. http://www.1cylinder2ride.com
Thanks again and ride safe wherever you are riding.
Cheers,
Thomas
Hi Thomas, and sorry for the late reply. Many thanks for your kind words. Looks like you’ve had an epic ride, and I will defo dig into your blog. Best of luck!
Hi, thanks a lot for the great info!
I’m looking at buying a KTM 690 in near future and will be doing very similar mods to set it up for long distance travel.
What year’s version would you recommend overall? The 2019 has added a whole bunch of electronics but Rally Raid wont be developing products for it.
Also up to ’13 you where able to read fault codes from the ECU with a chaep dongle and TuneECU, which could be very helpful to find problems. Also, while all those electronic aids like ride by wire and fancy ABS might be nice, I have never missed any of it on my older bikes. The less it has, the less will break I guess.
Would it be wise to go with a 2012 or 2013 model in good condition?
Not sure if I’m being too paranoid about electronics I wont be able to fix in the wild/
Pablo,
The new 690 motor is far, far smoother than the older motors. I would suggest you shop for one of those in spite of the electronics. I could turn everything off on my ’16 Duke with the new motor. It was extremely smooth and being able to turn off electronic functions meant that they would not fail. However, if you are set on a 690 Enduro I would like to suggest that you consider a KTM 500 EXC-F instead. I switched and I am delighted with the 500 over any former 620/625/690 I have owned. Lighter, better suspension, tougher, faster, easier to service and built for tough conditions. A hard bunch of attributes to deny. RTWPaul also recommends this bike.
Stu
The low temperature thermo-switch is far cheaper from KTM last time I looked, worth checking before you buy. Strange but true.
My Ktm 690 Enduro bike’s Engine guard has been destroyed by accident. How can I buy it from Bangladesh? Because here is not available in new. Please give me some advice on how can i solve it.